The industry standard for a clear recording’s turnover is 4:1. That means you need 4 hours to transcribe a 1-hour audio recording. In reality, it is more like 8:1 because you would be dealing with bad audio quality, factor in the accents, the ummm and the ahhss, different dialects, mumbles, and jargon, and you need to proofread the transcript.
The pay is not that great either; some even call it abysmal. This is the blunt truth. If you browse the net, many people would tell you that transcription is an excellent way to make money, but is it really? Or are they trying to sell you their service or want you to work on their platform? They use the internet buzzwords like ‘great income opportunity’ and ‘easy job that you can do from your living room wearing your favourite pyjama’, and they promise you unicorns and shit. But it is not as easy as they implied.
I am a qualitative researcher, and in my field, we require high accuracy and fast turnaround time. In my industry, a 2-hour recording turnaround time is two days. I always thought that it was more than enough until I started transcribing myself. And now, I have a new appreciation towards the transcriber community.
This post aims to make the transcribing process as painless as possible by sharing some tips/tricks on transcribing your recordings more efficiently.

Testing The Water
What is the meaning of “transcribe”?
- Someone who changed their gender from 172 spectrum to a cribe
- The final boss that you need to clear in the level 44 dungeon in Persona 5
- The process of converting audio to text
- All the above
If your answer is not number 3, oh boy, then know that you might be a retard, and please go out often, and touch the grass too. Transcribe means you take an audio/video conversation recording and convert it into text. In qualitative research, most audio/video recordings from our interviews must be converted into a transcript before we can analyse them.
Transcripts are important in qualitative research:
- It would significantly increase the quality of your information because now you can quickly analyse it in detail.
- Reduce the influence of observers (or moderators) when observing or conducting the group/interviews.
- It can somewhat capture the essence of the interview – what is being said, who said it, how they say it, etc.
- Capture and use the verbatim when you want to report your findings.

Where can I get a transcription job, and how much would I get?
Transcription services are widely used in many industries. The good thing is that it is always in high demand. Some people would argue that AI will soon replace the sector, but there’s no way it could replace human transcription.
There are a lot of places where you can get a transcription job.
- For the market research industry, approach your local market research company. Big players like Kantar, Nielsen, and Ipsos are safe bets as they always need transcriptionist services. Google “market research society + your country” and get their directory there.
- How much they pay: Average USD25 – 50 per hour, pay via direct transfer in 60days
- Specific industries: court, medical, accident report, academics, etc.
- How much they pay: Average USD20 – 50 per hour; they also usually pay within 30 – 60 days.
- Online podcasters, YouTubers, social media influencers –TikTok, Instagram, Facebook, LinkedIn etc.
- How much they pay: Average USD10 – USD20 per hour via PayPal or direct transfer.
- Online transcription sites (The most reputable & they welcome worldwide transcribers)
- TranscribeMe
- GoTranscript
- Appen
- There are so many. Google what is available in your location
- How much they pay: Average USD 8 – 30 per hour, usually paid by PayPal every week
- Online freelancing sites (Online platform that also provides transcription service)
- Fiver
- Upwork.com
- Freelancer.com
- How much they pay: Average USD10 – 30 per hour via PayPal, usually within a week
They would require you to take a test for online sites, so be prepared (Maybe use your secondary email when taking the test?). The application process can be challenging if you are new to transcription; on some days, you struggle to find any work, and it can take months to get in once you pass your application. You will be relegated to the lower-tier (low-paying job) until you have passed a certain level of experience (usually 1-3 years). Then, they will give you better jobs.
For freelancing sites, learn their mechanics as you can set your price and bid on their transcription projects with proposals. The price would vary as you compete with other freelancers. But, if you do well and the client is happy with you, there’s a potential for an ongoing relationship. Be wary, as there are scammers on those sites. If they ask you to transcribe something for free as a “test” and give you the “real transcript” afterwards, politely ask them to eat a rat poison sandwich.
There are a lot of sources on the internet to start your transcription journey. Browse around to see where you can offer your service and pick one that would suit you the best.
Did I mention that the pay is not great? Most of the time, it is lower than the minimum wage salary, which is terrible. Let’s evaluate. Assuming that you are like me, someone who can type 100 words per minute, you would need 5++ hours to transcribe a 1-hour recording. Let’s take USD20 per hour as the baseline, so you would probably get USD100-200 per week. Ask yourself whether or not it’s worth your time and effort.

Is transcription a job for you?
Transcription is not for everyone. You need to be prepared to have god-like patience + the low pay/amount of time you would spend completing each assignment.
Transcription is not for you if:
- You are looking for an easy job to earn money. This is not it, dude.
- If you are looking for a steady and stable income (unless you have an ongoing relationship with a client)
- Not willing to improve/try out new things. It would take a toll on you after some time.
If you think this is not for you, I wish you good luck and find other opportunities.
Are you still interested? Oh, let’s talk about something pleasant. Transcription also has its good side:
- Suppose you want to occupy your free time between jobs or looking for additional income to buy a new sofa or a powerful graphics card for your PC. It is a great potential for financial freedom.
- There’s so much to learn, and you would be able to listen and transcribe a lot of cool shit from all sorts of industries; market research interviews/focus groups, podcasts, YouTube vids, and sermons. Some of it is highly confidential, some would give you a sneak peek of new product innovation, and some are heart-wrenching or funny, but you definitely can learn something about it.
- If you want to set your schedule, do straightforward work quietly and alone with zero colleagues or superiors that breathe down your neck.
- If you have social anxiety and prefer to work on your own.
- There is great potential for the video captioning market. If you now scroll on Facebook, LinkedIn, and Twitter, most videos are on mute by default. All the content providers realised they couldn’t rely on the video sound to engage with their audience and look for a transcriber to help them with subtitles. This is a strong trend for the future (it already is.)
- Horn your grammar and spelling skills. This will help you decide to take on jobs from many industries that rely on good communication skills like blogging, proofreading, copy-editing, etc.
If you are still here and think this is for you, then yay! We have successfully weed out those weak-hearted people. Then, the remainder of this article may be just for you

What do you need before you start?
I advise spending a little money on your equipment and gear. I don’t mean investing a lot of money upfront, but ensuring you are set up for success. Depending on your preferred style and method of transcribing, you might need the following items to kick-start your transcribing career:
- Language proficiency – Most Asian/European are multilingual. If this is you, then bravo! The more languages you speak, understand and write in, the further you will go. Proficiency in dialects or slang is equally important.
- Good grammar and spelling skills – Self-explanatory.
- Comfortable chair and table – I can write a whole article about ergonomics because it is so important if you spend long hours trying to crack the recording. Make sure the chair has good lumbar support and a big enough table to rest your elbows on it and sit straight, you crooked banana!
- Laptop / Computer / Mac– A basic computer/laptop/Mac is sufficient. It doesn’t have to be top-range with a graphic card that can run Red Dead Redemption 2 on the highest setting, but it should not be as old as Lord Vampire Rothschild. It is good enough as long as it is responsive and can run word processing.
- Microsoft Word – You’ll have to get a Microsoft Word at least. Most transcription places that pay quite decently would require you to write in Microsoft Word. You can also develop a list of shortcuts using their Autocorrect function (we’ll talk in detail later). PRO-TIP: If you cannot buy them now, sign up as their developer. You would get 90 days of access to their full Microsoft 365 service, including Microsoft Word, free of charge. Lit AF. Otherwise, consider a side career as urm, you know, a pirate.
- Headphones / Earphones – Go for the noise-cancelling type. This would help you tremendously going forward. Get a really good one because this is your business investment.
- Proofreading software – Install Grammarly for your browser and Microsoft Word. The free version can do the job, but you’ll get more functions from the premium. It will help you to identify mistakes as you go along. It’s worth every penny if you are in this for the long run.
- Rope and Duct tape – Tie up your kids, cats, dogs, and partner in the basement because you need a quiet space with minimal distraction.
- Optional: Transcription software – There are so many free and paid software on the internet. Some of the famous ones are Express Scribe and InqScribe. Learn how to use it, as you can operate it using keyboard shortcuts or a foot pedal.
- Optional: Audio cleaning software/plugins – You can install an Audio extension for your browser (the one I use is called Ears) or install this free software called Audacity because you will work on some low-quality audio with a lot of background noise. Play around with the extensions/software to mitigate the noise.
- Optional: Dual monitors – Invest in another monitor if you have additional money. I transcribe for qualitative market research, so I constantly need to look up the stimulus, concept, discussion guide, spelling for jargon, etc. Keep your transcript file on your main screen and your second monitor for research. You would soon realise how shaving off a few seconds would help you to complete the transcript faster.
Types and output of transcription
The most important thing is ALWAYS TO ASK YOUR CLIENT what language preference/format/type they are looking for. The same client may have different preferences depending on the job/project.
Three types of transcription:
- Actual verbatim – some called it word-for-word or full verbatim. Simply put, you need to transcribe the whole conversation, including urm, ahhss, verbal ticks like you know, what do you call that, etc., profanity, pauses, repetition, etc.
- Clean verbatim – This is the cleaned-up version of the actual verbatim. That means you take out all those unnecessary urm and ahss, verbal ticks, etc., as long as the essence of the conversation is maintained, and this is much easier to read.
- Note-taking – This is more like you are trying to jot down the conversation’s essence in a live setting, more like a basic summary, while attempting to capture important verbatim for quick and easy analysis.
Now that you know their type, you need to understand the output expected for your transcript.
- Direct transcription – Also called a vernacular transcript. You transcribe it as it is. English to English, Spanish to Spanish, Malay to Malay, that spoken language converted to the same written language
- Translated transcription – The client might want to translate it to a specific language, i.e., Mandarin to English or Malay to Mandarin. You need to translate what you hear into the preferred language, not word-by-word, but to ensure that you translate and transcribe it into the preferred language without losing the essence of its meaning.
The most common in qualitative research is clean verbatim + translated transcription. Now, it might be different for other projects or other clients, so make sure you check with them first.

Transcript Format
I can provide the standard template for market research transcription. Again, ask your client if they have a specific format for you to follow. Read your client/transcription company’s guidelines thoroughly.
- Type of files: is it a Microsoft Word document, Google Docs, Microsoft Excel, etc
- Font size, font type and alignment
- How do you label the speaker’s name?
- Do they need a timestamp?
- Would they provide a template?
Some clients might request that you deliver the transcript in Excel format. PRO-TIP; do it in Microsoft Word, then copy+paste it because Excel is a bitch for spell check, formatting etc.
This is the template that I usually use: Calibri size 10, in .docx format, justify alignment, general speaker label in bold, no timestamp, only include a specific timestamp in the event of inaudible conversation.
Spend some time getting used to the format and understanding it before you start transcribing because it would take a lot of time to do the formatting once you have transcribed a huge chunk of text. So, get it right the first time and spare you the headache later.

How do you practice before you start transcribing?
Sadly, there are no paying sites for noobs where mistakes aren’t that serious, love is all around, and everyone lives happily ever after. But there are a few places that you can warm up into transcription
Practice your transcription skills on free sites like Ted or YouTube.
- TedTalk – Here’s an assignment: transcribe this video, record when you start, finish the first draft, proofread it, and when it’s ready. Then, check their transcript and see how well you are doing. You are doing great! ☺️
- YouTube – Any videos with transcription or CC.
Get some practice before you start bidding for a transcript job because mistakes can cause problems with a client or a bad rating.
Method to transcribe (Transcribing-hack)
You can use five methods depending on the job, audio quality, purpose, etc. But in general, high effort equals high accuracy. And vice-versa. Let’s go to each method one by one:

Manual Transcription
Effort: High
Accuracy: High
Additional Investment: None
When can you use this method: All the time
This is the most fundamental method for transcribing. Generally, you need to do the following:
- When you receive the transcript, quickly go through the audio recordings at various intervals. Check if the quality is consistent throughout.
- If the quality is poor, inform your client, ask them for a better version, or revise your turnaround time/price.
- If the background noise is too much, use Audacity. Click “Effects”, “Noise removal”, and “Select Noise Profile” to select a few seconds where it is quiet and nobody’s talking, then apply the noise reduction to the entire recording.
- If you are forced to work with a recording that sounded like an old man who forgot to put on his dentures, found a microphone from the old Nokia handphone and plugged it into a potato, then may God be with you.
- Do your first draft.
- Listen to the speech speed. If it is too slow, speed it up to 1.25x speed. If it is too fast, slow it down so you don’t have to pause and rewind frequently.
- If you recognise that you’ve made a mistake, ignore it and continue writing. Go back at the end of transcription.
- If you are stuck somewhere, mark the timing of the recording. Please stop trying to figure it out after three attempts. It would be easier to figure it out later as you have the context of the finished transcript.
- Record your time
- Proofread
- Now, use Grammarly to check for spelling errors, punctuation, etc.
- Check and fix your format.
- Submit your transcript
- Record your time to monitor your progress.
- ???
- Profit
Tips: Use Word Expander / Optimise your Autocorrect
Use the expander from day one. I mean that. You can set up the text expanders using your autocorrect function if you transcribe in Word.
To give you a perspective, my base typing speed is around 100 words per minute. But it would go up to 150 – 170 words per minute when I transcribe. Using Word Expander/autocorrect would increase your speed drastically.
If you use WhatsApp, Yahoo Messenger (RIP), or Mirc (RIP), you won’t have any problem with this method. When you type LOL, we want Microsoft Word to change it to “Laugh Out Loud”. Channel your inner teenager self and go wild.
The idea is to create automation as much as possible, and you would need to learn and come up with your own as you are transcribing. Try to do it for one word and see if you are comfortable with it. If you are not, change it. You would get mixed up and confused, but you’ll get used to it.
This process would take time to optimise, but once you build up an arsenal of these abbreviations and automation (also known as shorthand), get used to using them. Eventually, you have to speed up the audio because you would feel that it is too slow.
Create a set of rules/patterns, as it would be impossible for you to memorise all the abbreviations. Just like how you learn a new language, set some rules and patterns so it would make sense.
- Rule: Autocorrect your usual typo
- Liek – Like
- Tehse – These
- DO – Do
- Find out the words that you always got it wrong. Create an autocorrect to fix it for you.
- Rule: Abbreviate common phases
- Ins – I’m not sure
- Idk – I don’t know
- Idc – I don’t care
- Ook – Oh, okay
- Np – No problem
- Gonna – Going to
- Wanna – Want to
- Aa – alright
- Ty – Thank you
- Yk – You know
- Oc – Of course
- Wctym – What comes to your mind
- Rule: Remove all apostrophes
- Dont – Don’t
- Arent – Aren’t
- Ddnt – Didn’t
- Rule: Shorten the word
- Qltv – Qualitative
- Cncp – Concept
- Rule: Shorten the ending
- Prbx – Probably
- Etx – Exactly
Optional Tips: Use Keyboard Buttons in InqScribe
You can also set keyboard buttons in Inq Scribe to label speakers, timestamp, pause, rewind, slow down audio, etc.
Optional Tips: Use oTranscribe
If by some chance you still don’t have Microsoft Word, you can use oTranscribe. It is a tool for typing up transcription and allows you to type and control the audio/video recording on the same page.
Estimate time saved:
8:1 (8 hours to transcribe a 1-hour transcript)to 6:1 (6 hours to transcribe a 1-hour transcript)

Manual transcription with foot pedal
Effort: High
Accuracy: High
Additional Investment: Yes
It is similar to manual transcription, but purchasing a foot pedal to maximise your performance is highly recommended. Any time you control your audio with your mouse, you lose time that you can use to work on the transcript.
The foot pedal is not a highly complex piece of equipment, so there is no reason for you to go and look for “the best foot pedal” and all that. Find one that can fit your budget and buy one.
Estimate time saved:
8:1 (8 hours to transcribe a 1-hour transcript)to 4:1 (4 hours to transcribe a 1-hour transcript)

Assisted Transcription Using YouTube Auto-Generated CC
Effort: Medium
Accuracy: Medium – High
Additional Investment: None
When can you use this method:
- Only when the audio/video is clear
- Only when your speaker talks without a heavy accent.
- You are transcribing in the following languages: Dutch, English, French, German, Indonesian, Italian, Japanese, Korean, Portuguese, Russian, Spanish, Turkish, and Vietnamese.
- It works even better if your client wants true verbatim as it would capture urmss and ahhss.
This is my favourite, but sadly, most transcription jobs require translation + transcription. A couple of steps are involved, or you can refer to the official YouTube channel.
- Upload the video to YouTube (Unlisted)
- If it is an audio recording, create a video using Microsoft PowerPoint Presentation with the audio sound and save it as a .mp4 file.
- Set the video language as English / your recording’s spoken language
- Wait
- Wait
- Wait some more
- The usual turnaround is your video duration in minutes times 3. So, a 60-minute video would take 180 minutes for YouTube to process. It can be varied, though.
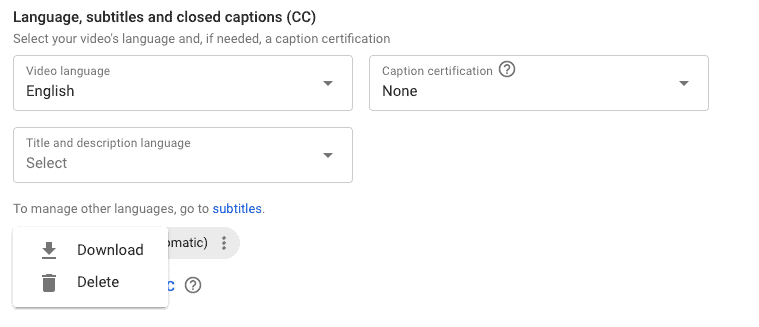
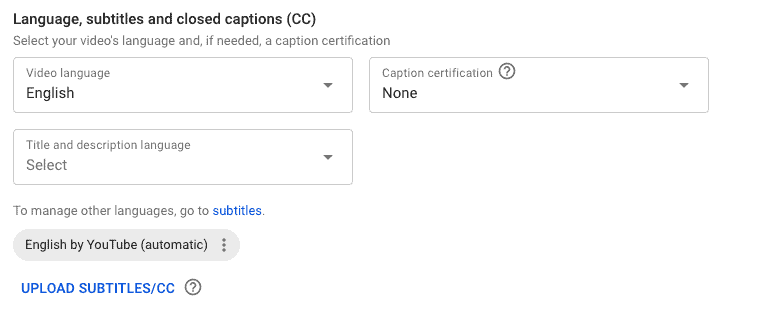
- Download the subtitle
- See those 3 dots? Click on it and hit the download button. And don’t forget to like our video and subscribe. Yuck. Just joking.
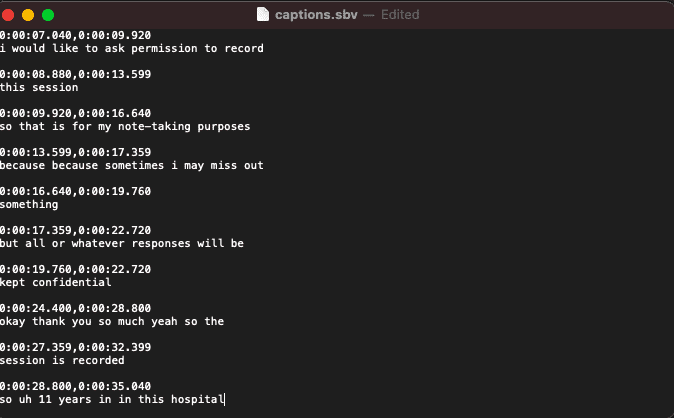
- The default file would now be in. sbv. Use TextEdit (Mac) or Notepad (Windows) to open the file.
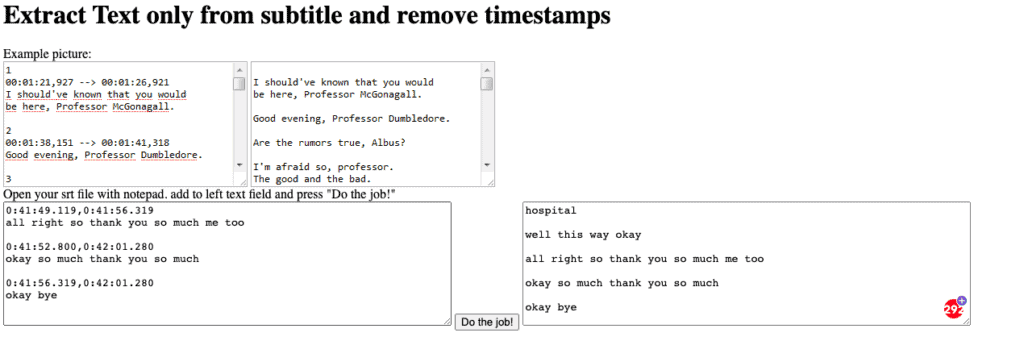
- If you need the timestamp, then great. But if you don’t, go to Anatolt to remove the timestamp.
- Copy the whole transcript from your .sbv, paste it in the left text field, and hit the “Do the job” button.
- Copy the whole output on the right field and paste it on Microsoft Word
- If you are transcribing for a clean verbatim, quickly read the entire transcript and identify the verbal ticks, urmmss, and ahhss. Jot it down.
- Use the Replace function in your Word processor. Find “Umm” and “You know” and replace it with nothing (leave it empty).
- Record your time
- Listen back and edit
- Manually edit the entire transcription into your format. But YouTube should have at least done 80% of the work. Play the recording and check word-by-word. Edit and clean up any mistakes and type whatever the automated transcript didn’t catch or got wrong.
- Record your time
- Proofing – use Grammarly to check for spelling errors, punctuation, etc.
- Check and fix your format.
- Submit your transcript
- Record your time to monitor your progress
Estimate time saved:
8:1 (8 hours to transcribe a 1-hour transcript)to 6:1 (6 hours to transcribe a 1-hour transcript)

Assisted Transcription Using Google Voice / Microsoft 365
Effort: Medium
Accuracy: Medium – High
Additional Investment: None – Or maybe a good microphone
When can you use this method:
- If you have a good and clear pronunciation
- If you have your own quiet space
- If your kids/pets are well-behaved
- Work well if you need to translate and transcribe
The trick to this method is to speak clearly with a deliberate tone and speed. There are two ways/applications that you can use this method.
Use Google Voice
- Start a new Google Doc
- Go to “Tools”
- Click “Voice Typing”
- Click on the microphone icon on the left.
- You can either play the recording and let the microphone transcribe, or you can listen and speak directly into the microphone. The latter is more accurate, and that’s what I would recommend.
- If you are translating and transcribing simultaneously, listen to the entire sentence, use context to interpret, and then only start dictating.
Use Microsoft365 Online
- Open Microsoft365 and choose a new Word document
- Click dictate
- Choose “dictate”, and you can either play the recording and let the microphone transcribe, or you can choose to listen and speak directly into the microphone. Similarly, the latter is more accurate.
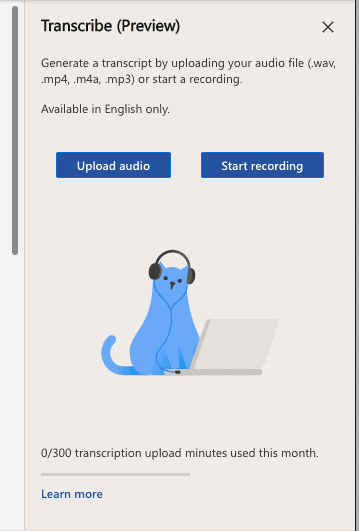
- Or choose “Transcribe”. It will allow you to transcribe the recording for 300 minutes a month, which is plenty.
- Check and fix your format, edit and clean up any mistakes
- Use Grammarly to check for spelling errors, punctuation, etc.
- Submit your transcript
- Record your time to monitor your progress
Estimate time saved:
8:1 (8 hours to transcribe a 1-hour transcript)to 5:1 (6 hours to transcribe a 1-hour transcript)
Assisted Transcription Using Transcribing Apps
Effort: Low – Medium
Accuracy before proofing: Low – Medium
Additional Investment: Maybe, if you go for a premium account
When can you use this method:
- If you have a good and clear pronunciation
- Especially when you are on the go – transcribing the conversation directly from your phone
- If the venue where you conduct the interview/transcribing is quiet
- Very useful for Note-taking
Weird advice, but try to sound like Siri. Or Jarvis. Most of the voice-to-text apps respond well when I use a robot voice. Not robotic, but a very level tone.
I have installed and deleted many apps, but Otter is the most advanced thing I’ve tested and used.
- Otter.ai – Use this Ref Link, and we’ll both get 1-month Pro-Lite. If you don’t want to use the link, then it’s okay. 😔
- LiveTranscribe for Android – I have never used it but heard good things about the app. Go and explore.
- If you have a Pixel phone by Google, they also have a live transcription application. Again, I am unsure about the output and quality, so please let me know if you have any feedback
Estimate time saved:
8:1 (8 hours to transcribe a 1-hour transcript)to 6:1 (6 hours to transcribe a 1-hour transcript)
Final word
Now that you are here, I hereby grant you this magic potion that would give you +3 knowledge, +2 courage, +4 confidence and now you have levelled up from a Noob to a knight. You have completed your first tutorial. Congratulations.
I saved a lot of time using the foot pedal + manual transcription with the text expander method. Find your preferred style. Keep practising, and you’ll get there. The best way to get better is to keep trying to go faster and more accurately. Keep track of your timing, and beat your own record.
If you find this useful, bookmark it. If you think someone might think this is useful, share it with them. You don’t have to give us credit; you can tell them verbally, but spread the word.
COVID won’t just go away so soon, and the damage done to the world’s economy and how we go about life won’t just reverse overnight. But that doesn’t mean it’s just going to be bad for everyone; there is more to life than those things. You might land your first transcript job, buy a new TV, finally win a round of Warzone, and get your dream job; who knows?
Now, go forth, my child. May transcription God watch over you. Happy New Year! Cheers